GE Dryer E03 Error Code
The Ge Dryer E03 Error Code is an outlet thermistor short circuit error. It means that the outlet thermistor on the dryer is shorted and needs to be replaced.
Understanding The Operation Of The GE Dryer Oulet Thermistor
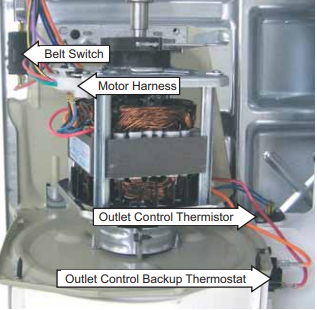
The outlet control thermistor is positioned at the bottom back section of the blower housing, situated beneath the outlet control backup thermostat. Its function is to gauge the temperature of the air exiting the system and react to any fluctuations in this temperature. The data regarding these temperature changes is then relayed to the power board. The power board, in turn, uses this information to determine the necessary heating adjustments. The resistance values of the outlet control thermistor are:
80 Ω at 86°F (30°C)
100 Ω at 77°F (25°C)
120 Ω at 69°F (20.5°C)
Specific failures associated with the outlet control thermistor can initiate error codes E03 and E05.
GE Dryer E03 Error Code Repair
To access and replace the outlet thermistor to repair the E03 error you will need to remove the top, control, and front panels (see instructions below). Once those are removed the dryer drum will have to be removed then you can access the outlet thermistor. Disconnect the two blue wires from the thermistor, remove the two Philips-head screw, then lift and slide the thermistor from the blower housing.
How To Remove GE Dryer Top Panel
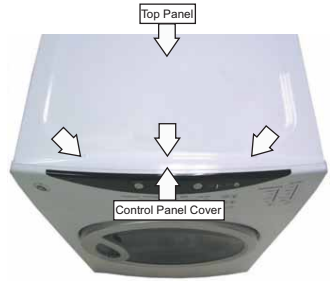
Remove the three Phillips-head screws at the back of the panel that attach the control panel cover and move the cover rearward or move to the front on the machine and push the panel backwards. Raise the panel about 3 inches and the panel will lift off.
How To Remove GE Dryer Control Panel
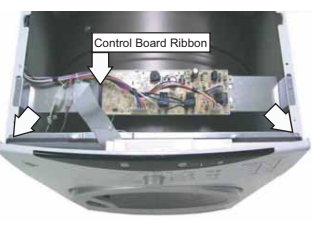
After removing the top panel (see instructions above) disconnect the ribbon cable from the power control board. Remove the two Phillips-head screws holding the top of the control to the cabinet. Lift the control panel up and set it aside.
How To Remove GE Dryer Front Panel
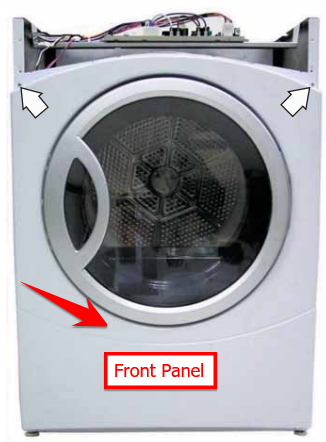
After removing the top and control panel (see instructions above) disconnect the door switch wire harness and
the sensor rod wire harness to the power board. Remove the four Phillips-head screws that mount the front panel to the cabinet. You may need to lift the front of the dryer to get to the bottom screws. Be careful the edges of the sheet metal can be sharp and cut . Set the front aside.
How To Remove GE Dryer Drum
After completing all the steps above if your dryer is a gas model disconnect the inlet control thermistor and inlet safety thermostat wires from the control board. The next step is for all models.
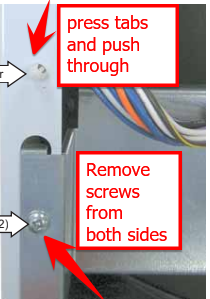
Disengage the front plastic clip mounting the control board wiring harness to the cabinet. Remove both screws holding the mounting bracket to the cabinet.
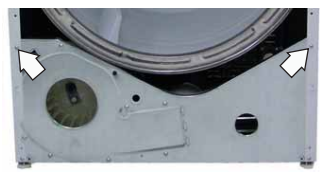
Remove the screws from both sides of the cabinet and spread the sides of the cabinet apart so there will be room for the dryer drum to come out of the cabinet. The next step is to disengage the drive belt from the idler pulley and motor.
How To Remove Ge Dryer Belt
First if you haven’t already follow all of the steps listed above. When performing the next step keep in mind that the idler arm is under pressure so be careful when releasing the tension to not let it snap back on you.
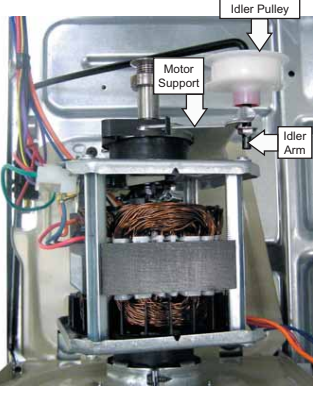
Reach under the left side of the drum, press the idler pulley arm down and to the right to release the tension on the belt. Then lock the idler arm in the notch on the top corner of the motor support. Remove the belt from the motor and idler pulley and position the belt so that its not going to hang on anything when you go to the next step.
Finally the last step in removing the GE dryer drum is to use the belt as a handle and pull the drum forward removing it from the dryer cabinet.
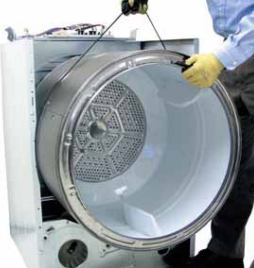
Once all the steps above are completed you now have access the outlet thermistor that is mounted blower housing assembly, all there is left to do now is remove the outlet thermistor and install the new one.
The outlet thermistor you need to make this repair can be ordered from the link provided below under repair parts.
GE Dryer E03 Error Code Repair Parts
If you have any questions about this GE Dryer E03 Error or repair you can post a question in our GE Dryer Repair Questions Forum and a qualified technician will help you.